Tuesday 31 January 2012

Loving Best of Everything

I'm still catching up with posts, as the lovely ladies who received today's cards will realise. As most of you won't have seen them & that I really liked them, here we go anyway! They're all using the Best of Everything set, which still makes me smile every time I see or use it.

First up is one I made for my gorgeous stamping friend Kim.
The birdie & branch are actually sparkly in real life, as they're stamped with frost white shimmer paint, coloured with reinkers. The colours are concord crush, melon mambo & lucky limeade. The spotted paper & flower swirl papers are from the Cheerful Treat hostess only DSP pack & are one of my fave papers from this year. The happy birthday wishes image is from the fab Petite Pairs set.
I've used the dotted scallop ribbon, dotted side down with some cotton twine for my bow. I carried the paper to the inside too:
I made the next card for my dear friend Wendy's birthday. It's similar to the first & used many of the same supplies. This time, I used a crumb cake (kraft) base with melon mat. The stripe DSP & concord crush DSP is also from the the Cheerful Treat DSP pack.
And one more simple card before I go....I made this little thank you card with some leftover pieces I had on my desk. It was really quick & easy, but I think it's cute.
Hope you like these cards, as much as I liked making & giving them. Thanks very much for visiting & if you have any questions or would just like to say hello, please leave a comment. I love hearing from you. Until next time,
Inky wishes, Di

Supplies:
Best of Everything 1
Stamps: Best of Everything, Petite Pairs, Happiest Birthday Wishes (hostess)
Card/Paper: concord crush, melon mambo, lucky limeade, whisper white card, Cheerful Treat DSP (hostess)
Ink: elegant eggplant, lucky limeade reinkers, frost white shimmer paint, concord crush ink pad
Accessories: basic pearls, melon mambo dotted scallop ribbon, cotton twine (non SU)
Tools: itty bitty punch pack

Best of Everything 2
Stamps: Best of Everything, Petite Pairs
Card/Paper: crumb cake, melon mambo, whisper white card, Cheerful Treat DSP (hostess)
Ink: elegant eggplant, lucky limeade reinkers, frost white shimmer paint, melon mambo ink pad
Accessories: basic pearls, melon mambo dotted scallop ribbon, cotton twine (non SU)
Tools: itty bitty punch pack,  scallop edge punch. Big Shot, Circles #2 die (largest circle)

Best of Everything 3
Stamps: Best of Everything, Petite Pairs
Card/Paper: crumb cake, melon mambo, whisper white card, Cheerful Treat DSP (hostess)
Ink: elegant eggplant, lucky limeade reinkers, frost white shimmer paint, perfect plum ink pad
Accessories: basic pearls, celery grosgrain ribbon (retired)
Tools: Big Shot, Square Lattice embossing folder, itty bitty punch pack

Friday 27 January 2012

My Christmas card...& more tags

This is it...finally my last Christmas project from 2011 & it's my Christmas card.
Unfortunately, circumstances meant I didn't get to finish or send most of them, but I wanted to post it here anyway, as I was really happy with how it turned out & disappointed I didn't get to send our Christmas greetings to friends & family. I did think about using it for next Christmas, but decided to show you all instead.
Here's a closer view, so you can see the detail a bit better. (which I still have to show you!).
The colours are wisteria wonder & elegant eggplant. I've always had a thing for purple & I love love love this monochromatic combination.

This card includes some of my favourite images & things. I'm sure you recognise Dasher the reindeer. I combined him with the gorgeous Peace on Earth (from Four the Holidays), Merry Christmas (from Delightful Decorations) & a beautiful image from the new Charming set in the Summer Mini. Charming isn't a Christmas set, but I just HAD to use the image as it's soooo pretty. I clear embossed it on the purple card (much shinier irl). The ruffled wisteria ribbon is just yum & the top note shape got a little nod too!...as well as many punches!

Anyway, while I'm raving about the Charming image, I made matching Christmas gift tags using it & the scallop tag from the Two Tags die. The light was bad when I took the pic, so the eggplant doesn't look quite right.
I also used it for tags on Cara's school dance teachers gift bags which I made with DSP.
Jolly Bingo Bits is back
And finally before I go, I have two more tags to show you using Jolly Bingo Bits.
Cara had a male teacher this year - always tricky for gifts. I decided to go with a more manly night of navy & riding hood red combo for the tags & used the star/snowflake from Jolly Bingo Bits. I like how the smaller image lets you layer the punches & not obscure the lovely scallop stitching....which I realise in hindsight is not very manly, but c'est-la-vie! I'm sure he still liked the wine inside the bag!
His second gift had a definitely more manly look too!
Anyway, I think that's it for Christmas for me. I hope even though that Christmas is gone for 2011, that my projects give you some inspiration for this year...or the next.
Until next time, inky wishes from me.
Di

Supplies:
My Christmas card
Stamps: Dasher, Four the Holidays, Delightful Decorations, Charming
Card: wisteria wonder, elegant eggplant, whisper white
Ink: elegant eggplant ink pad, versamark pad
Accessories: wisteria wonder ruffled ribbon, basic pearls, clear embossing powder
Tools: Big Shot, Top Note die, Circles die, Circle Punches -1 3/8 inch, 1 1/4 inch, 3/4 in, 7/8 inch, heat tool, embossing buddy
Eggplant Charming Tag
Stamps: Charming, Four the Holidays
Card: whisper white, elegant eggplant
Ink: elegant eggplant ink pad
Accessories: basic rhinestone
Tools: Big Shot, Two Tags die, Circle Punches -1 3/8 inch, 1 1/4 inch
Riding Hood Red Tag & Bag
Stamps: Charming, Four the Holidays
Card: whisper white, riding hood red, choc chip, retired DSP
Ink: riding hood red
Accessories: Accessories: riding hood stripe ribbon (retired)
Tools: Big Shot, Two Tags die, Circle Punches -1 3/8 inch, 1 1/4 inch
Melon Mambo Tag & Bag
Stamps: Charming, Four the Holidays
Card: whisper white, regal rose, melon mambo, Flirtatious DSP
Ink: melon mambo
Accessories: white organza ribbon
Tools: Big Shot, Two Tags die, Circle Punches -1 3/8 inch, 1 1/4 inch
Jolly Bingo Bits tags
Stamps: Jolly Bingo Bits, Four the Holidays
Card: whisper white, night of navy, riding hood red
Ink: night of navy
Accessories: riding hood stripe ribbon (retired)
Tools: Big Shot, Two Tags die, Circle Punches -1 1/4inch, 1 inch

Thursday 26 January 2012

Happy Australia Day!

Just popping in quickly to wish Happy Australia Day to everyone. Hope you've had a great day celebrating our beautiful country with friends & fun.
...and from Cara, Harry & Jaz......."Aussie Aussie Aussie!"

Tuesday 24 January 2012

Punch Pal Christmas treats

I'm sure you're getting sick of seeing Christmas projects, but I couldn't finish without showing you some little treats I made for Cara to give to some special buddies at the end of the year.

Hanging Penguin Shaker Ornaments
First I made these little hanging Christmas shaker ornaments using some sweet treat cups for her special buds & school dance teachers.
The little penguin from the very cute Punch Pals set is stamped in elegant eggplant, coloured in with markers, then cut out & mounted him on a stamped background. The sweet treat cup is filled with a mix of faux snow & dazzling diamonds glitter & is quite sparkly in real life. The remainder of pieces are either punched or die cut. See the supply list below.

Here's what they look like from the back. The cute snowman is is from the Tags til Christmas set. He's just stamped in elegant eggplant & coloured with a red marker.
If you want a more boy suitable version, you can omit the white piece & it looks like this
I got this fantastic idea to use the treat cups like this from fellow Demonstrator Michelle Grech. You can see the fantastic Christmas trees she made here. Thanks so much Michelle!

I took photos of each construction step to make a photo tutorial, but I haven't had time yet. If I get enough comments requesting one, I'll consider getting back to it.

Snowman Treats
I needed to make some more treats & realised the little bags I'd bought didn't fit the choccies I bought (sigh), but Damien the wonder husband came to the rescue with some pre-packed marshmallow swirls. These said "snowman" to me, so I stamped, coloured & punched the cute little snowman from Punch Pals to make a little topper. These were really quick, but I think they were really effective.
Here's a close up version. Some are coloured a little more girly & mounted on melon mambo & some more neutral & mounted on celery. On the back, I made a custom greeting in word to say Merry Christmas from Cara...but no pic!
Here's how they looked all packaged together...
Jelly Bean Treats
Finally, I made some some Christmas jelly bean treats, which were really colourful....& yummy. These had another greeting from Tags 'til Christmas & a little greeting from Cara on the back...which you can see in a couple of them below.
Anyway, I hope these give you some ideas for treats. Of course, you could easily change the colours & stamps to suit birthdays, Easter, Valentines Day etc.

Thanks again to Michelle for sharing the idea for the sweet treat shakers & thanks to you all for hanging in with my Christmas projects. I'm sure I only have one more Christmas project to show you now - my own Christmas card - & then I'll move on.
Until next time...
Inky wishes, Di

Supplies
Hanging Ornament
Stamps: Punch Pals, Tags 'til Christmas
Card: real red, bashful blue, whisper white card
Ink: elegant eggplant ink pad, real red, elegant eggplant, pumpkin pie markers
Accessories: dazzling diamonds glitter, sweet treat cups.
Tools: Big Shot, Perfect Pennants die (white doily), circle punches - 2 3/8 inch, 1 3/4 inch

Snowman Treat
Stamps: Punch Pals, Tags 'til Christmas
Card: certainly celery, melon mambo, whisper white card
Ink: soft suede ink pad, real red, elegant eggplant, melon mambo, certainly celery, wild wasabi, choc chip markers
Tools: 2 3/8 inch scallop circle punch, circle punches, 1 3/4 inch circle punch

Jelly Bean Treats
Stamps: Tags 'til Christmas
Card: real red, whisper white card
Ink: real red ink pad
Tools: scallop square punch

Sale-a-bration Starts Now!

Yes, it's the time of the year we love love love - Sale-a-bration is here...& this year it's bigger & better than ever with even more free goodies to choose from & a super special when you join Stampin' Up . Can you tell I'm excited?
Everything you need to know is in the fantastic Sale-a-bration catalogue but here's a summary.

When does the fun happen?
Sale-a-bration (SAB) starts today & continues until 31 March 2012.
You can earn free goodies during SAB in two ways:
Spend:
Every $100 you spend on any catalogue items, earns you one exclusive free SAB item of your choice.
Host:
If you host a Stampin' Up! workshop with total sales of $600 or more, you'll earn one SAB item of your choice free.
Workshops can be hosted in your home, or you can simply collect orders from friends & family to earn your freebies.
What goodies are available?
You can choose from stamp sets, a designer paper pack, or a brad & ribbon pack. All the available items are shown below  Bet you can't choose just one favourite.
These items are ONLY available during Sale-a-bration & can only be earned - not purchased.
(click the pic for a bigger image)
Join the fun & save on our Starter Kit!
During SAB, you can purchase our fabulous full Starter Kit for just $249 AND get choose an additional catalogue stamp set of your choice for free.
If your wishlist is massive & you'd like to receive a discount on everything you buy, or have been thinking about how Stampin' Up! could help pay for your hobby or become a business, Sale-a-bration is your time. Check out my SU website HERE for more info & give me a call for a totally no pressure chat.

You can also find out more about Sale-a-bration & download the SAB brochure  here on the SU website.
If you'd like a SAB catalogue or you have any questions about anything SU related, please don't hesitate to contact me.

My new stamping room is almost finished, so I actually have a place to stamp. Hopefully I'll get a chance to play with some of my pre-ordered SAB goodies (just another perk of being a Demonstrator).
Back soon I hope.
Inky wishes, Di

Monday 23 January 2012

Merry Christmas pennant banner

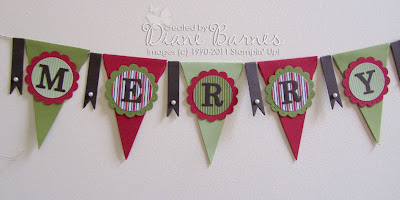
The next project I have for you is a Merry Christmas banner we made in my November class & was a really fun one to make.
click on the pics for a bigger version
My gorgeous friend Kellie designed the banner & I loved it so much & knew my class ladies would too, that I asked her if I could use it for my class. It's a bit tricky to fit & light 1.2 metres of banner in a photo though!
Here's a single pennant to show more detail!
The colours I used are riding hood red, old olive, certainly celery and early espresso together with the Letters to Santa & striped Patterns (celery & olive) DSPs. The DSP circle & scallop circle are punched out, pierced & attached to the pennant. The letters are of course from my very well used Timeless Type alphabet die set.  I used linen thread to hold the banner together, but our new Bakers Twine (Summer Mini) would be perfect for this project too.

It looks like a bit of work to make, but as the pennants & flags & letters are cut using the petal cone die (see the pic below) & the circles are punches, it's pretty quick.
Each die cut makes 2 pennants. Simply cut off the tab & then cut the remaining cones in half. The rounded end is simply folded over the string & adhered - easy!  The flags are cut out in early espresso card, folded in half over the string. Al little pearl adds some shine.
Since the banner is something I'd like to use each year, we all made a simple tab box to store it in. I made it big enough to make it easy to fit the banner in, but small enough to protect it. Wrapping it in some tissue will also help it to stay together in the box too. This is a decorated version, in case it's for a gift, but you could just make a plain version too.
I think that's all I need to say for now. Hope you love this idea & are thinking of all the other occasions you can make banners for. I'm thinking I need one in my moved & almost complete new stamp room.
If you like this idea, leave me a comment to say hi & I'll pass it on to Kellie too (she's a bit of a bad blogger these days but I still love you heaps Kellie!).
Back again soon.
Inky wishes, Di

Supplies:
Card/Paper: riding hood red, old olive, certainly celery and early espresso card, Letters to Santa DSP & Patterns DSP (celery & olive stripes)
Accessories: basic pearls, linen thread
Tools: Big Shot, Petal cone die, Timeless Type junior alphabet dies,  punches: xl scallop circle die, 1 3/4 inch circle punch, piercing tool

Christmas petal cone box

I almost forgot to show you today's project - a petal cone box that I demo'd at Kim's Christmas workshop in November. These fun boxes are really easy to make for lots of different occasions, but a little tricky to show clearly in one pic apparently.
The box is really quick to make using the petal cone die. The die includes the petal cone shape, a half circle scallop & a flag. Here's a pic of the die.
To make the box, I simply cut 2 cone shapes in white, which I wheeled in riding hood red with the Sparkle Jumbo wheel) & cut 2 half scallop circles in riding hood red. To assemble the box, fold & flatten the score lines made by the die & run a strip of sticky strip down both flaps & join together. Attach the half scallops underneath 2 opposite petals & you're done. I decorated my box with some Christmas baubles & a Merry Christmas sentiment from the Delightful Decorations stamp set (in lucky limeade & riding hood red). The box holds quite a lot - I think I fitted around 24 Darrell Lea jingle balls in mine - yum!

I also took a quicker version of the box to show the ladies, which was also wheeled with the Sparkle wheel. I used a scallop sentiment from Perfect Punches to decorate with some lucky limeade ruffled ribbon.
Well, that took longer to write than to actually make the box, so I'd better leave it there. If you have any questions or just want to say hello, just leave a comment.
Thanks heaps for visiting. I think I only have 2 more Christmas items to show - 1 of which also uses the petal cone die, so hopefully I'll be back soon.
Inky wishes, Di

Supplies:
Stamps: Delightful Decorations, perfect Punches
Card: whisper white, riding hood red card
Ink: riding hood red, lucky limeade
Acessories: certainly celery taffeta ribbon, lucky limeade ruffled ribbon, basic rhinestone
Tools: ornament punch, scallop circle punch, 1 3/8 inch circle punch, 3/4 inch circle punch

Tuesday 10 January 2012

Tag folder for a special hostess

The shutter guy is still hard at work in my new crafty room & has to get to our bedroom after that, so I think I have time for another post.
I realised I haven't shown you the hostess gift I gave the lovely Kim at her November Christmas themed workshop. This was a very special workshop as it I ran it with one of my newest downlines - Beverlee - who also happens to be Kim's Mum. I demo'd a petal cone die project (reminder that still need to show you that too) & Beverlee took the girls through a make & take card (which I don't have a pic of - sorry!).
My gift was a book of Christmas tags...
Here it is open...
I've included 8 tags in the pack & a little roll of ribbon to use with the tags. They're made with the smaller of the tags in the two tags die & are decorated with stamps & punches. The tags are about 11cm x 5cm each. I just love how the tag end co-ordinates with the scallop circle punch.

More about the folder... It's very simple - just one piece of card scored & folded a couple of times to make a spine & base. I can't give you the measurements for this one as I forget to take them before I gave the folder to Kim. I think the front is probably around 14cm x  9cm though.
I've put together this quick template to show you the score lines required. You can adjust the size to fit whatever you want inside.
Notes:
  • The vertical score lines form the spine of the folder.
  • The horizonal lines form a base & a flap to hold the items in place. I cut out the centre piece as shown to make a neat finish.
  • I use a brad to secure the edge of the flap. This also holds the ribbon in place (you can see the brad on the cover - I covered the inside with the paper).
  • Just one more tip - the base scores should be half the width of the vertical scores, so the folder folds neatly in half.
I've made quite a few of these folders over the years for note cards, as they make great gifts. You can see some oldies here & here if you're so inclined.
While I'm linking, you can see another Big Shot project I demonstrated at Kim's previous workshop here.)

Well, this post has taken me so long that the shutters are all installed now, so I'm off to check them out... after adding the supply list. Until next time.
Inky wishes, Di

Supplies:
Stamps: Snow Swirled (snowflake & sentiment), Perfect Punches (Joy at Christmas), Easy Events (mistletoe), Contempo Christmas (sentiment)
Card/Paper: riding hood red, cherry cobbler, certainly celery, garden green, very vanilla card. Letters to Santa DSP
Ink:garden green, cherry cobbler, wild wasabi, riding hood red ink pads
Accessories: pear pizzazz poly twill ribbon, very vanilla 1/4 in grosgrain ribbon, basic rhinestones
Tools: Big Shot, Two Tags die, 1 3/8in circle punch, 1 1/4 in circle punch, scallop circle punch
crop-a-dile (holes in tags)

More Christmas stocking SAS cards

The shutter guy cancelled yesterday, but he's here bright & early this morning, so I'm taking some time out with my morning cuppa to share some more cards. These are the last 2 cards from my October Christmas SAS... or the month of the stocking.
I chose a non-traditional colour combo of island indigo, pool party & certainly celery....& I actually tilted a panel! The stockings are stamped & punched out, then layered on the white panel with dimensionals only near the toes. The whole tilted panel is also raised on dimensionals. I love love love the Peace on Earth sentiment (from Four the Holidays) - such a beautiful font.

The next card uses the same basic pieces in a different layout, with the same colours mixed up.

Keep reading if you'd like to see how this final card evolved...
This card was actually the second version of this card below.  I changed it, so that it would be a little quicker to make & so that both SAS cards could use the same pieces.
That card was actually based on this card below, which I liked, but didn't suit the colours & look I wanted. For some reason, it has a real retro feel to me - maybe it's the rounded corners & lacy border. Not sure!
Anyway, I think that's all the stocking cards I have for you for now, so I'll be back with something different next time. Don't forget that the stocking punch is only available while stocks last.

Inky wishes, Di

PS: Looks like the shutter install might take a while, so I may be back again!

Supplies:
Tilted stocking
Stamps: Stitched Stockings, Four the Holidays
Card/paper: certainly celery, island indigo, whisper white card, Island Indigo Patterns DSP (in colors 11-13)
Accessories: basic rhinestones, pool party ruffled ribbon
Tools: stocking punch

Pool Party stocking
Stamps: Stitched Stockings, Four the Holidays
Card/paper: pool party, certainly celery, whisper white card, Island Indigo Patterns DSP (in colors 11-13)
Accessories: basic rhinestones, island indigo ruffled ribbon
Tools: stocking punch

Retro stocking
Stamps: Four the Holidays
Card/paper: riding hood red, certainly celery, very vanilla card, Certainly celery Patterns DSP (subtles), Jolly Holiday DSP (retired)
Accessories: gold brad
Tools: stocking punch, dotted scallop ribbon border punch, corner rounder punches (current & retired)

Monday 9 January 2012

Stocking Joy

I'm just waiting for the guy who's installing our new shutters to come & thought I'd share a quick project. It's another simple Christmas card from my October SAS...with no stamping (shock!).
Like my last card, I used a punched stocking replace the letter J in Joy. The stocking top & foot is slighly raised & faux stitched to add a little more detail (click on the pic for a better view). The layout is a fave one using my trusty top note die. I think that's all I need to say, but if you have any questions, just let me know.
I have a few more stocking cards to show you next time, then on to something different.
Inky wishes, Di

PS: Just remembered! - Stampin' Up! have advised us that the stocking punch will NOT be carrying over into our next Idea Book, so stocks will only be available while stocks last, or until the Summer Mini ends on 31 March at the lastest. So, if you'd like to order this punch, just contact me.

Supplies:
Card/paper: old olive, very vanilla, cherry cobbler card, Jolly Holiday DSP (retired)
Accessories: cherry cobbler dotted scallop ribbon
Tools: stocking punch, Big Shot, Timeless Type junior alphabet dies, Top Note die

Sunday 8 January 2012

A personal share

Hi everyone
Hope that you all had a lovely Christmas & new year surrounded with family & friends. I'm sorry for my absence, but it's been a very difficult month for our family. I don't normally share much personal info on my blog, but I feel compelled to explain...

Our lives were turned upside down on December 18th, when my darling Damien's brother Josh passed away suddenly. As you can imagine, we, his parents, Josh's wife, kids & friends are devastated at his loss & are gradually trying to come to terms with it. Thankfully, we were all able to spend Christmas together as a family, but are now back at home. This is hard, since we live far from one another.
Through all this, we have all felt very blessed to have so much support, practical help, thoughts & prayers from many beautiful friends, family & our church community. For this, we feel truly grateful.
I'm not really sure why I wanted to share this here, but I guess it has made me more aware that we never know how long we have on this earth, so I hope that through this sadness, I can be more aware of the many, many reasons we have to be grateful to be here.

On a more trivial note, I've been thinking about whether to post the remaining Christmas projects I had planned to show, since Christmas seem so far away (both past & future). I've decided that I'll gradually post them & other projects I have as time & inclination permits. I hope that sharing my little projects here will in some small way provide inspiration to others, in the same way as I am inspired & thankful for all the wonderfully creative people who share projects on their blogs & pages & in person.

Until next time.
Warm wishes, Di